Yoga Flow for People With MS
Hide Video Transcript
Video Transcript
BETH PASSEHL
Hello, everyone, Beth Passehl here with WebMD. I'm a certified yoga teacher and I'm welcoming you to this yoga flow for people dealing with mild symptoms of MS. Before trying this practice, make sure you speak with your doctor to be certain that physical activity is appropriate for you. I've gathered some items to help with the practice, with a sticky mat to help with the grip, a sturdy chair, a towel, a yoga strap, which if you don't have one, a belt or bathrobe strap will also work. Lastly, we have a yoga block. And if you don't have one of these, you can use a hardcover book as well.
We're set up here in a cool room with the air conditioning running and a water bottle handy. As we practice, be sure to take breaks as needed to avoid overheating. We'll begin our practice now in Mountain Pose. The foundation here is our feet. So pressing the feet into the floor, let the toes open and spread.
Lift your arms straight up overhead, relaxing the shoulders again here. So arms can be straight or bent, lifting out of the pose now, releasing the hands. I'm going to add a block to this same pose. So feet hip width apart. Press your hands now into the block and resist the hands firmly into the block to help straighten the arms.
This will give you a deeper muscular engagement and experience. So definitely ramps up a Mountain Pose with just the arms overhead. Releasing the block now, and we're going to place the block away, out of the way, and pick up a chair and a prop to help us do a Mountain Pose again in a seated position.
This time I've got a towel. I'm going to also bring the block for another option. We're going to sit to the edge of the chair, feet hip width apart, knees hip width apart, hands on either side of the spine.
Lift your arms overhead as before. From here, we're going to release the hands down. Take one hand. Hold the edge of the chair. The other arm lifts up. And lean to the side.
Notice the lengthening of the side body here. Both sides, so second side up, arm up, and stretching over. Release the hand.
From here we're going to take our towel. And we're going to have one hand holding each edge of the towel. Your hands are shoulder width apart now. Feet are hip width. Resist the hands out into the towel as you lift the arms up and overhead, again, creating more muscular engagement and a deeper experience of the pose.
Depending on the day, this option will work for you. Taking the towel now, moving it out of the way, picking up a block, so we're going to find some muscular engagement in the legs by placing the block between the thighs closest to the knees. Arms lift up overhead, pressing the hands, one hand to the edge of the chair, the other arm overhead. Releasing, switch sides, one arm up and all the way over, all the while pressing the legs into the block to help maintain a muscular engagement and a deepening of the pose.
All right, we're going to exit out of this and come into a Half Downward Dog. So starting with the chair firmly placed on the sticky mat, so it's very stable, hands on the top of the rung. This gives us a chance to experience the pose with a lot of support here.
So lengthening the back body, pulling the hips away from the hands, feet are pressing into the floor and the shoulders relaxing away from the ears. This might be enough for you. But if you'd like to deepen the experience, we're going to turn the chair and give another option.
So now we're going to put the hands not on the high rung, but on the seat of the chair. This will give a deeper stretch to the quadriceps, the hamstrings, and the back. So begin with the knees bent. It may be that you need to keep your knees bent this entire time, which is fine.
If it's available, you'll begin to straighten the knees and lift the hips a little higher-- arms straight, legs straight, back straight. And this gives a fuller expression of Downward Facing Dog with support from the chair. So we'll walk forward. And now get ready for a couple of standing poses. This is a place where we can really build some strength.
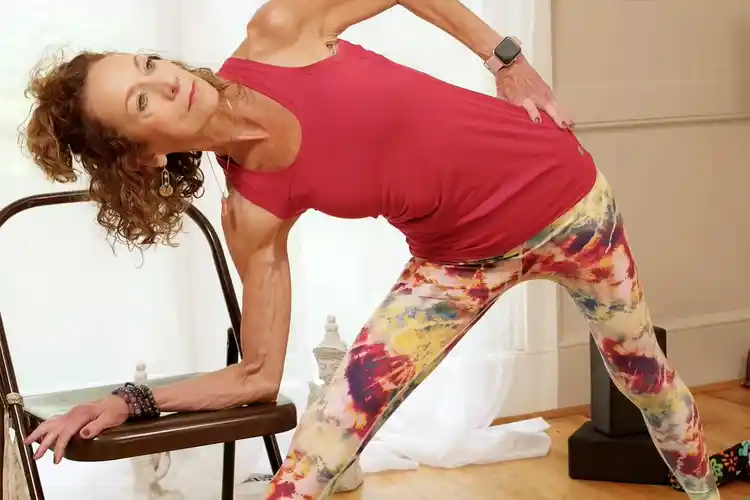
So I'm using the chair again. And I've got it set off to the side. So we're going to step the feet wide. Turn your back toes in slightly and your front foot near the chair all the way out. As best as you can, you'll keep the legs straight. Place one hand on the chair and the other hand on your hip. Shoulders pulling away from the ears, relax the face.
And then assess where your neck may be feeling. If it's a little tight, sometimes looking down at the foot will help it to feel a little better. If you're wanting to deepen the pose, bend the elbow, come on to the forearm, fix your hair, return your hand to the hip.
So, again, with the neck, if it feels tight, go ahead. Look at your hand. Sometimes that can relieve some of those tight neck muscles. To come out, we're going to slightly bend that front knee, hand to the chair to help lift up. Turn the toes. Step the feet together.
We're going to move the chair. So step back to move it, second side. So again, feet are the foundation here. Step the feet apart, turning the back foot in slightly. And then turn the front foot out.
So that's the leg closest to the chair. Now, the hand closest to the chair is going to reach down. Place the hand. So this is a place to start. Your knees may or may not bend here. Depends on you, depends on the day.
Turning the head to look down if the neck is a little tight, up if it's feeling better, or looking straight ahead. Deepening the pose, maybe moving the chair slightly, coming on to the forearm. Once again, the front knee in particular may need to stay slightly bent here. And that's perfectly appropriate. You've got the support of the chair.
Taking a few breaths here, assessing, where is my neck today in this pose, on this side. To come out, slightly better in the front knee. Lift up, hands on hips. Step your feet together. A moment in Mountain Pose.
All right, we're going to transition to Pyramid Pose. So we're placing the chair. Notice that all four rungs of the chair are really well supported on the sticky mat. Feet hip width apart, step one foot back with the toes turned slightly out.
Both knees ideally would stay straight here. So with the arms straight and the legs straight, this is the first place to begin. Knees may or may not stay straight here. Either way, if you want to deepen the pose, you can move the chair in slightly and come onto the forearms. Notice the length of the back is what's important here. So we're lengthening the back body, pressing the feet into the ground.
To come out, straighten the arms. Bend the front knee. And then we'll step the second side back, so second leg back, toes turned slightly out. Beginning with the arms straight, full breath here, and maybe then moving to hands on the-- forearms on the seat of the chair, taking a moment here.
And then lifting up, step the feet together. Use the chair to help lift up. We're going to move into a couple of poses now where we're on the ground. So use a blanket to help pad.
I'm going to demonstrate coming from a standing position using a chair to come to the floor. We're also going to gather all of our props so we don't have to go scooting around to find them. We're going to come down onto the knees and then begin to push the chair out of the way. Place the hands to the ground.
And then we're going to scooch over onto the side hip and slowly come onto the shoulders and then the back. Take your time here, as much time as you need to create this transition from standing to lying on your back. We've got our towel again. And I'm going to roll it this time and make a small piece of support to put under the low back. So lift the hips and place the rolled towel under the low back.
Straighten your legs one at a time. And think of this as another Mountain Pose now and we're lying on the back. Bend one knee into the chest.
And then we're going to use our strap or the towel or use a tie from a robe and then straighten the top leg. The leg may or may not straighten here again. And it's fine if it doesn't. But you've got the strap. And create some resistance, the strap into the foot, the foot into the strap.
Bending the knee to come out, we slide the strap off. And once again, straightening both legs, a brief second in that Mountain Pose, bend the second side. Knee into chest, straightening the leg, one hand on either side of the strap, and create that resistance of the hands pulling down on the strap, the foot pressing back up into the strap.
Notice the shoulders are pulled away from the ears. The back is supported. And then when we exit out of this, we're going to release the strap by bending the knee. And then move the prop out of the way, back to a brief moment in Mountain Pose.
And now we're going to transition into a Bridge Pose. So bending both knees, you've got your towel. So lifting the hips, one hand on each end of the towel. And use the towel now to help straighten the arms and pull the shoulders up away from the ears.
Hips can lift as high as possible. And then release the towel. Release the hips. And then roll over to find your block.
And now we're going to try the block under the back body. So you can have it on the low height under the sacrum. But if you're feeling a little more energetic or feeling stronger today, you can actually turn that block up to a medium height and have a little more bigger experience in the Bridge Pose.
To come out, lift the hips. Remove the block. Now we're going to find that towel again and we're going to roll it up one more time. And this time we're placing it under the cervical spine, so right up there under the neck as we're moving into Savasana.
And this is a place where we are going to totally and completely relax and rest the body and the mind. So allow the muscles to be completely passive here. There's nowhere to go. There's nothing to do. Let the face be soft, the eyes. And the breath is easy.
In just a moment, I'm going to demonstrate how to come out of this pose. But stay in your Savasana as long as you need. From here to come out, though, I want you to bend both knees. Roll to the side. Place the hand on the ground and use your arms now. Use the arms to help push up and lift up to a seated position.
I'm going to sit with the legs straight, but that is totally your choice. It may be better to have the knees bent. And at some point, you may need to just lift up all the way and sit in a chair. But for now, we're just showing with straight legs.
And then we're going to transition to come all the way out. So leaning over towards the chair, pull the chair in, one hand on the chair, two hands on the chair. And then let the feet move in and let the chair help lift you up.
Finally, hands to heart. Namaste. Thank you so much for joining us today.